Wacom Intuos4 Review - It Really Speeds Up Your Work!
I've had the medium sized Wacom Intuos4 graphic tablet for exactly two weeks now and I really have to say this from the start, this is an amazing graphic tablet! In September of 1998, or a shocking twelve years ago, Wacom released their first Intuos tablet. It's without a doubt that the first, second, and third series of Intuos tablets were a hit, but when Wacom hit the fourt revision, they decided to change it alral.
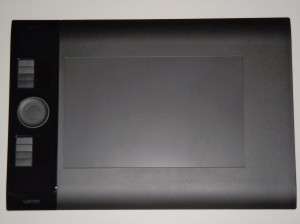
The Intuos4 features 2,048 pressure levels for use with brush size, opacity, or anything you may choose, eight ExpressKeys for you to set to any function or program you wish, a touch ring control to control the canvas size or practically anything else, a grip pen with ±60 degrees of tilt control (great for calligraphy and sketching), and finally, a wonderfully designed Wacom Intuos4 medium tablet with its rather large 8.8" x 5.5" tracking area.
While I had lots of fun with the Intuos4, I was at the same time testing out all of its features and what it can do for me. In the end, I found that the Intuos4 alone sped up my work easily by two times. I've been using a mouse with Photoshop for so long that I cannot even tell you how long it's been. And for me switching to the Intuos4 for around two weeks and even using it for my client work, I really know now what this professional tablet can do for me and my freelance work. Because I only really design logos, websites, and wallpapers, I honestly thought that a tablet wouldn't help that much because I don't do enough free-hand drawing but in fact vector work. I proved that theory wrong.
Now let's throw all that information behind and on with the full review! Try to excuse my rather unprofessional photography. I've never said I was great at photography. :P
What's in the Box
When I first unboxed the tablet, I was amazed from the very beginning. All of the accessories that come with the tablet just feel that they've been designed for durability.
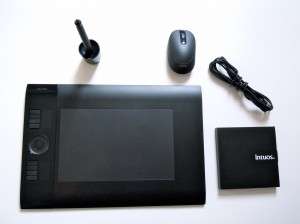
The tablet, some start guides & software, wireless mouse that takes no batteries (that works fairly well if I might add), the standard grip pen, USB cable which is a rather long length of 2.5m/8.2ft (and is simply a mini-USB port -- no proprietary cables; thanks Wacom!), and lastly, the pen stand which feels extremely high quality because of it's rather heavy weight. One last thing that some forget to include is that there are some different colors (white, gray, and red) that you can put around the tip of your pen. They serve really no purpose but to please the user and because I prefer black, I'll stick with the standard look.
The pen stand servers as two purposes: to hold the pen and to hold the pen nibs & nib extractor. I really have to give a hand over to Wacom for creating the pen stand this way. It's nearly impossible to loose a nib (which is simply the tip of the pen, but each nib feels different) and the nib extractor. Now you're most likely not going to be changing the nibs too often but if you run out, you can always order extras.
The Different Pen Nibs & Pen Extractor
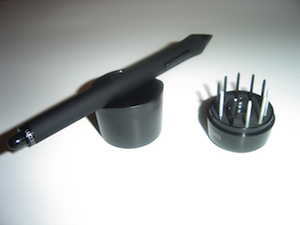 The pen conveniently comes with a total of ten replacement nibs: five standard nibs (which are the basic black ones), one flex nib (one with the rubbery tip), one stroke nib (the one with the spring), and three hard felt nibs.
I've used all of these nibs during my reviewing processes, and this is just my personal preference, but I love the flex nib. The flex nib glides across the tracking area of the tablet so easily that it almost feels that you're writing on a whiteboard. For me, I've never been a pencil fan (I always write with a ballpoint pen) so I dislike the feel of the felt nibs.
There's no right or wrong way to use it (okay, is it just me, or doesn't that sound like the iPad commercial?). You can use whatever nib you like best, and honestly, I love the fact that Wacom gives you so many extra nibs. The thing is, if you like the flex nib like I do, you might possibly need to order more from their site if the rubbery-like tip starts to degrade over time, or any nib for that matter.
The flex nib was actually added to the Intuos4 and was not in any of the previous versions. I have to say, I'm glad they decided to add it in because it's by far my favorite nib!
Lastly, the pen extractor is very simple to use. All there is to it is to insert the end of the pen extractor in between the tip of the pen, tighten the extractor, and pull the nib straight out. It's easy to use but it was sometimes difficult and took a couple of tries to get the different pen nibs out there. If you wear out your pen nib to to a rather small point, you may not be able to remove the nib. There's no way to get the pen nib out other than using the extractor so if your pen nib is getting shorter, replace it as soon as possible!
Other Information and Accessories
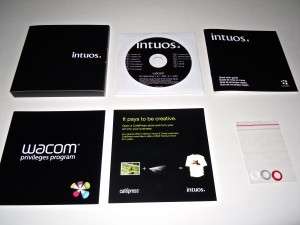 The software itself is extremely easy to use, which we'll cover later in the review, but it does support Mac OS X and Windows. But from my amazement, Wacom does offer some solutions for Linux users which we'll also cover later.
Wacom doesn't include any of that worthless junk that you typically get with products like this. No one-hundred page warranty book or a huge manual; it's all organized and you know what, I really appreciate how minimal Wacom is with their packaging.
One thing I need to cover are Wacom's vast amount of accessories. They offer different pens in the style of an airbush, art, and inking pen. Which all serve different purposes. Also, along with that, you can order some official cases, different mice, surface sheets, and grips.
One minor disappointment I do have is that the Intuos4 does not come with a case. I'm not sure how many designers travel with their graphic tablets, but for someone doing freelance work, I can see a case coming in help when you're traveling to a client's workspace. But hey, it helps keep the cost low for the Intuos4 so I'm not complaining.
Input Devices
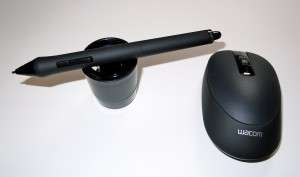 There are two ways to use the Wacom Intuos4, either with the different pens or mice. The mouse has to be one of the best of its kind that I've ever used... and I'm being serious on that. Even though the mouse only works on the tablet (because the tablet uses EMR technology), if Wacom made this into a real wireless mouse, it would be one of the best out there. What really makes this mouse is that it's built rock solid! If you try to squeeze this mouse in your hands, you don't hear any noises with the plastic rubbing together compared to typical mice. Whatever Wacom did to make this mouse so stiff and sturdy, they did one amazing job.
One other thing on the mouse is that it comes with a good amount of buttons. You have the left & right click, the wheel button, and the back and forth buttons. And because of that EMR technology, it takes no batteries. You don't need to worry about paying any additional money to power these input devices... period. That's awesome if you ask me.
I have to say the pen feels so natural in the hand and the grip is perfect. There's not much to the pen but it features two buttons which you can set to anything, the pen tip with your desired nib, and the eraser on the back. Like the mouse, it's very durable and feels like a real pen, maybe just a tad bit thicker. The two buttons take some time getting used to, but once you use the tablet enough, it feels rather normal actually.
The Intuos4 Itself
The Intuos4 is amazing. What really makes it amazing is the customizability you have. The Intuos4 is made for everyone both right or left handed. Because of that exact reason, Wacom actually includes two places to plug in the cable. The top right side and the bottom right side both have a mini-USB port. If you're right handed, you would plug it in the top right and if you're left-handed, bottom right. That's some serious thinking in the design if you ask me!
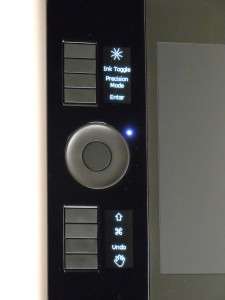
There's not much to say about the tracking area because that's not as exciting as what's on the left portion of the tablet. On the left hand side of the device (or right if you're right-handed) you can see the two sections of ExpressKeys and the touch ring in-between.
The touch ring is compatible with programming up to four different settings. For example, I have mine set to zoom, cycle layers, brush size, and brush hardness. All these four different settings can be easily changed by pressing the center button and along with that, you see the light on the Intuos4 change to the desired settings.
You can somewhat see in the images above that the ExpressKeys are raised. This significantly helps because if you need to touch a button without looking at it, you can feel easily which one it is.
ExpressKeys help quite a bit to take those commonly used keyboard modifiers and basic functions off your keyboard and right in one single click of a button. The default settings are great for the most part but I tweaked them a bit for my optimal performance.
Hardware Summary
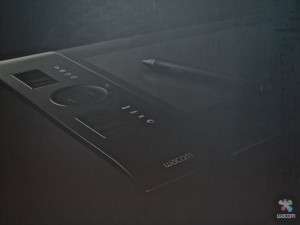 The Wacom Intuos4 shines with its glorious ExpressKeys and its handy multi-function touch ring. I've used many graphic tablets in the market and by far, the Intuos4 is the best graphic tablet I've ever used.
It might be too cliché to say that, but to be rather honest, the Intuos4 is one slick looking device and it's so versatile that anyone can practically use it. Whether you're an engineer working with SolidWorks or a freelancer like myself working in Adobe Photoshop, this tablet is for you.
Its functions built right on the Intuos4 are absolutely incredible and it saves me quite a bit of time. The main goal of the Intuos4's button layout is to get your hands off that keyboard and keeping them on the Intuos4 the entire time you're doing your work. For me, that has been proved so much that I've found myself using the tablet for typical uses like writing an e-mail or even browsing the web. It's so natural to use, that you won't think twice at putting those hands back on that keyboard.
The hardware isn't all; the software that interacts with the tablet speeds up your overall work ethic so much that it's not even funny.
The Software Itself
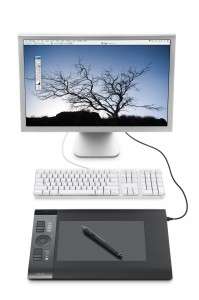 As we did state before, you can find the Windows and Mac OS X drivers on the included disk. What we didn't cover yet would be the marginal Linux support.
In Linux, there are some packages you can install to get the tablet working, but unfortunately, there's none of the same customizability you get on the fully supported OSes like Mac OS X. But then again, I didn't dig down too deep because I didn't want to mess anything up... like my Linux kernel which the packages did need to modify a bit. I was unable to get the pressure sensitivity and the buttons to work on the Intuos4 in Linux. I don't blame the software or Wacom for this. They don't provide true Linux support, but Wacom has considered it.
On the other hand, Linux and the Wacom Intuos4 are perfectly usable. I can see someone using Blender (a CAD program) on a Linux-based system with the Intuos4. But for designing, I would honestly say to stick with Windows or Mac OS X for now.
On the Mac side of things (sorry Windows users -- I've thrown Windows out the door of the operating systems I use for many reasons), the software that powers the Intuos4 couldn't get any better. It's so easy to use, it's so functional, and it's extremely compatible to fit your needs. As we'll cover next, you'll find that it's so powerful, you can eliminate going up to that menu at the top to do certain functions... for good.
The Radial Menu
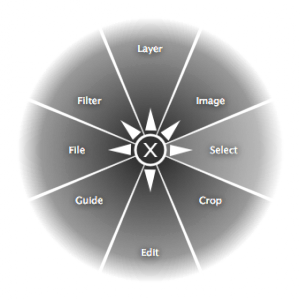 This is the best thing Wacom could've done to their software. The radial menu is simply a menu you can access by pressing a programmed ExpressKey on the Intuos4. It features a nicely eight option radial menu taking those commonly used features right into this easy to access menu.
As you can see from the right image, that's my radial menu, and yes, it does resemble Photoshop's menu bar very much so. I set my radial menu with my most commonly used features in the menus I use the most. For example, I added (new) guide and crop buttons to the main section of my radial menu because I use these features the most out of everything in the menu (I use crop for clipping images on a website design if you're wondering-- slices just don't work for me). All of the other options are submenus that lead to different options.
Obviously you cannot have rather long descriptions in here because the radial menu would simply add an elipsis to the end. I'd rather not see an elipsis, so I've kept all my titles rather short. Although I wonder if Wacom ever thought of making the text size smaller or customizing the size of the radial menu to compensate for that.
This radial menu speeds up my work so much that it's crazy. By diving through those menus all the time where some options I never even use just does not make sense. Yes, I know I can customize them to my needs, but I'd rather not. Having this radial menu customized the way I work helps so much that once you use it, you'll want the radial menu even when you're not near the Intuos4.
Software Configurability
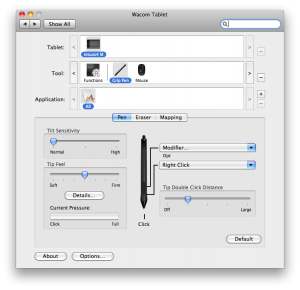 The main customization of the Intuos4 is done via this control panel right here, which on Windows, looks very similar. It of course allows you to customize the radial menu, touch ring, ExpressKeys, sensitivity and feel of the pen, mouse, and of course, the two buttons on the pen itself.
The settings are extremely customizable and it does take some time to tweak to your liking. But once you have everything set up the way you like it, it'll feel just as natural as writing on a piece of paper!
There's only one main problem I see with the Wacom tablet settings, the settings of the radial menu could have a bit more features. There's no way to move a option around in the radial menu if you don't like it in that place -- you have to delete it first then add it in again. This is somewhat aggravating when I first set up my radial menu. I didn't like certain options in these areas and I had to move them around. I would expect some re-ordering support in the left hand column and some way to reorder the items within those menus. It's not something you're going to be customizing every day, or at least I hope not, but it's part of the first-time user experience. That was probably the hardest thing for me to set up because the order is just critical to me. It's, however, by far the best feature on Wacom's software, but the editing of it could be quite a bit better.
The Included Third Party Software
The Wacom Intuos4 comes with some rather popular third party applications that are actually extremely useful.
It comes with the following:
- Adobe Photoshop Elements 8 (older version)
- AutoDesk SketchBook Express 2010
- Corel Painter Sketch Pad
I only have SketchBook Express and Painter Sketch Pad installed because I find it a tad bit redundant to install Photoshop Elements when I really don't even need it. Overall, both AutoDesk and Corel made some amazing programs there, but I find myself leaning more towards the Corel Painter Sketch Pad side of things. It's so easy to use and it's almost like you already know how to work it even before loading it up.
These three pieces of software, especially Photoshop Elements 8, compliment the Wacom Intuos4 in such a way that it really extends your ability to design. Some designers will argue that Photoshop isn't for sketching and that Wacom included these pieces of software at no additional cost really helps open designers (or anyone else for that matter) to other programs other than Photoshop for their drawing needs.
The Final Viewpoint
After using the Intuos4 for a couple of weeks now, I have to say I noticed how much it does for me in little cost of time. It's amazing to see the functions of the pen, the mouse, touch ring, ExpressKeys, and the radial menu come together to form this one product that fits nicely on your desk.Even the way Wacom designed the touch ring adds four different functions you can switch between and in the long run, helps get my hands off my mouse and keyboard on on the tablet itself.
If you're a professional graphic designer looking for a product that not only allows you to draw amazing graphics with, but also speeds up your work significantly, the Wacom Intuos4 is for you. It's a professional product geared to take some of that stress us professionals have to deal with using typical input devices like the keyboard and of course, the mouse.
I'm of course using the Intuos4 in the design industry, but that can be streched for people who work with 3D applications like SolidWorks, video work in Final Cut Pro or Adobe Premiere, or even for a fancy device to sign your name with (did I really say that? Well, you know that's true!), the Wacom Intuos4 can be used in practically any field you may have and you know what, it will make your life easier.
If you're wanting to get your hands on a Wacom Intuos4, click the below link:
And if you're wanting to pick up some accessories like cases, extra nibs, or a different style of a pen for your Wacom Intuos4, check out their accessories webpage:


Stalk me on social media! Any other way would just be creepy…
Follow me: